Deliberate Ambush
This section discusses the different types of ambushes, factors to take into consideration when planning an ambush, and other tips related to this topic.
Definition: An ambush is a surprise attack from a concealed position.
A deliberate ambush can be used against:
- Any force or person about whom sufficient prior information is known.
- Units or targets with patterns.
- Convoys that use the same route.
- Forces or individuals that are lured to a location with a ruse or deception.
Straight Line Ambush
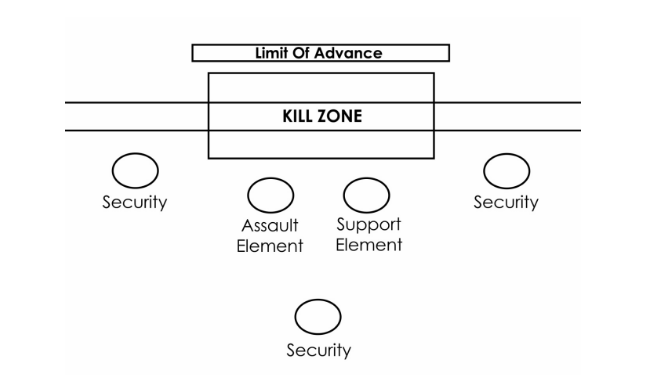 Diagram: Straight Line Ambush Formation
This ambush uses fire from one flank to saturate the killing zone.
It's very effective against a small force that is not using an advance guard. It can easily be flanked and is difficult to use against large formations. It is often sited where it is difficult or impossible to move off the trail or road.
It can be positioned perpendicular to the target's line of approach (crossing the T), but it's not ideal since it gives the enemy's rear element the opportunity to maneuver and flank the ambush party.
Mines or booby traps should be installed on likely areas of cover and concealment on the far side of the ambush to force the enemy to remain in the killing zone or to kill them if they seek cover.
L-Shape Ambush
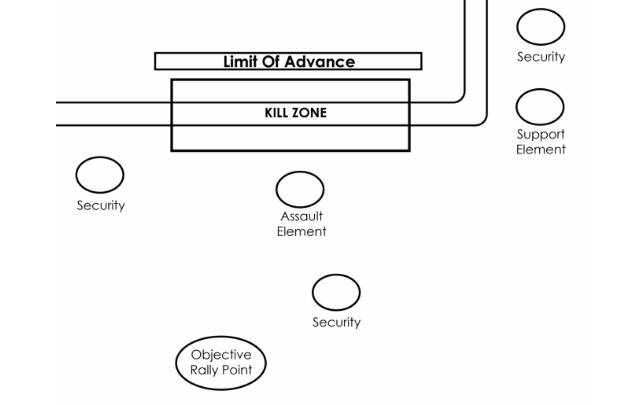 Diagram: L-Shape Ambush Formation
This ambush setup uses fire from two directions.
It is highly effective along curves and bends. It is more difficult for the commander to control the ambush party effectively.
This ambush can be used effectively against convoys. A first leg could attack the major vehicular targets with heavy fire. The second leg would then use suppressing fire against enemy personnel as they detruck.
Careful placement of the machine gunner and other heavy weapons is extremely important for this ambush.
Generally, the ambush party should be deployed so that the enemy entrance and exit are perpendicular to the short leg of the ambush; the long leg is usually set parallel to the expected route of the target.
Mines placed on the uncovered flanks are useful to prevent flanking during this ambush.
Automatic weapons should be close to or in the center of each leg to allow greater overlapping fire in the killing zone.
A technique called a staggered engagement can be used: one leg of the ambush fires, so it appears as a linear attack at first, and then at a preset time or under special circumstances, the second leg opens fire.
The special circumstances can be: the initial leg's inability to suppress return fire or to stop the enemy's efforts to organize a counterattack.
V-Shape Ambush
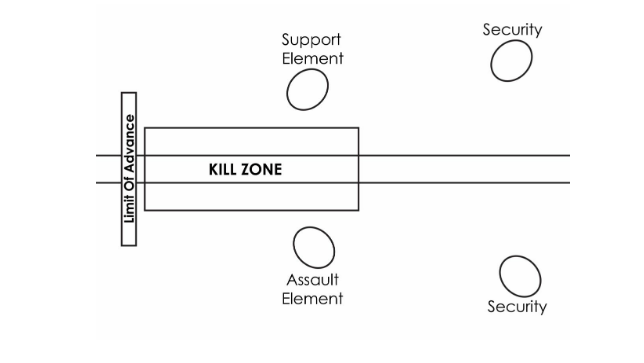 Diagram: V-Shape Ambush Formation
This ambush permits fire at the enemy from all directions, preventing any cover. It can be useful in some areas.
If there's sufficient depth along the legs of the V, it denies the ambushed party a safe area in any direction.
Using this ambush can increase the risk of friendly fire. When used from a height, lost bullets hit the ground.
Demolition Ambush
This ambush consists of using a remotely controlled explosive device to blow up the enemy.
This ambush is extremely useful when the enemy is numerically superior or has far heavier firepower. It often involves radio-controlled explosions or an improvised explosive device (IED). Even a drone can be used.
This ambush avoids, where possible, the use of guns so that when the explosive blows up, it prevents the enemy from knowing if it's a booby trap, how many attackers there are, or where the ambushers are.
A safe location to set off the explosives is from an observation point that is not within effective enemy gunfire range if the ambush fails or is only partially successful.
Security elements with radios can be used to advise the commander when the target is in the killing zone.
Sharpshooters with silencers can be used to pick off enemies who try to escape after the initial explosion.
The disadvantage of using this ambush is the time it takes to set it up.
This type of ambush is useful for the following objectives:
- Conducting harassing attacks that psychologically demoralize the ambushed force.
- Delaying an advance.
- Canalizing the defending force into a bigger ambush.
- Denying safe passage through an area.
- Diverting attention or finite assets of the defending force.
- Frightening the defending force into treating everyone like an enemy in its population resource control measures.
- Economically crippling the defending force, which in response adds better armor to their vehicles, making them sluggish and incapable of pursuing ambushers into the backcountry.
Bait-Trap Ambush
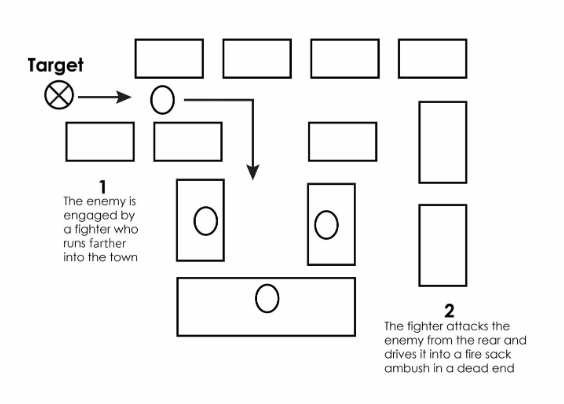 Diagram: Bait-Trap Ambush Formation
The enemy is lured into the killing zone through the use of its own tactics.
Useful when the ambushers know the target's standard operating procedures (SOP) and are certain of the action the target will take once the firing starts.
To lure the enemy, a dead body or a weapon can be left on the ground. Small arms fire from a distance can be used so the enemy moves further into a dense urban area and into a dead end where it is ambushed.
Time of the Ambush
Night Ambushes
Night ambushes are effective in hindering an enemy's use of routes of communication. It also makes getting air support for the enemy more difficult. Due to low visibility, it is preferable for the ambushers to have automatic weapons or shotguns at close range to engage the target.
Day Ambushes
Command and control is easier. It permits offensive action for a longer period of time. Effective fire is more easily executed. Due to increased visibility, day ambushes are effective for executive (high-value target) attacks (e.g., when the target is going to work in the morning) as they facilitate the identification of the target.
Selection of Appropriate Areas and Sites
Any area where surprise can be achieved can be selected.
Characteristics to look for in site selection:
- The target can be channeled into a kill zone.
- There should be good fields of fire, a good view of the kill zone to aim and shoot.
- There should be good cover and concealment for the ambush force.
- Where possible, there should be natural obstacles to prevent the target from reorganizing or fleeing from the site.
- There should be concealed approach and withdrawal routes for the ambush party.
- It has covered routes of rapid withdrawal.
When the area is selected, then the actual ambush sites are selected. Favorable terrain is everything. Limitations should be considered: deficiencies in the firepower available, lack of resupply during actions.
The best ambushes are sited at locations that appear to be unlikely ambush sites but that actually give an advantage to the ambusher.
The ideal ambush site restricts the target on all sides, confining it to an area kill zone where the target can be quickly neutralized.
Ambush sites should have firing positions that offer both concealment and favorable fields of fire. If possible, firing should be done through a screen of foliage, rocks, or walls.
There should be no cover in the killing zone for the enemy.
An ambush should be set in a way and in a location where the ambush commander can allow the target to pass by in the event that circumstances change and he decides that the attack should not be carried out.
The ambush party must have a good view of the killing zone when on the ambush site.
At night, the ambush party must be concealed even if daylight comes.
Navigating to an Ambush
The ambush commander can use a friendly guide or local resident who knows the area and can help avoid dangerous or problematic areas to get to the ambush site.
It is better to enter the ambush site from behind; the killing zone should be left untouched, or traces of the ambushers will be left behind. The most common cause of broken ambushes is failure to enter the site from behind.
The ambushers should be given enough time to travel to the ambush site during the planning phase. The time required to establish an ambush is generally 30 minutes.
Time is also needed for the nature around the ambush site to get back to normal. The ambushers should get on site hours before the target arrives.
Layout of the Ambush
The Objective Rally Point (ORP) should be defensible and not located along any likely avenues of approach of the enemy.
The ORP should be close to the ambush site. It is useful for transferring anyone who accidentally stumbles upon the ambush and who is not to be eliminated to be held at the ORP, or to bring resupply to the ambush site if necessary.
The ORP should be far enough from the ambush site that it will not be overrun if the enemy attacks/counterattacks the ambush. The distance will depend on terrain, cover, etc.
The sectors of fire of each element should be designated beforehand to ensure the whole kill zone is covered.
Mines and explosives can be installed to canalize the enemy.
It may be necessary to organize secondary ambushes and roadblocks to intercept and delay enemy reinforcements.
For night ambushes, illumination may be installed behind the kill zone and used during the ambush since it helps focus fire on the enemy. Targets can be illuminated using flare guns, or the illumination can be placed behind the killing zone and low so that targets are silhouetted.
Waiting at the Ambush
Four to six hours is the maximum that the ambushers can stay immobile and silent; afterwards, they will be less alert, their physical abilities get reduced, etc.
Issues such as sleeping patterns, wake-up signals, and communication signals should be established before the operation.
Comfort items should be prepared (like mosquito repellent).
Noise discipline is essential. The noisemakers should be cleared out when getting on the site (sticks, gravel, etc.). A comfortable environment should be created but should not be recognizable by the enemy.
Movements should be limited as much as possible.
Every movement while waiting should be slow and deliberate to make sure it won't dislodge anything, create noise, or visually alert approaching enemies.
Every 15 to 30 minutes, one part of the ambush party should be moved to stave off numbness and cramping.
The ambush party should empty their bladder before going into position.
The ambushers must drink plenty of fluids before the operation for optimal performance.
Extra clothes should be brought to wait at the ambush site; it is useful against the cold and insect bites.
Every member of the ambush party should have their guns on safe while waiting. Safeties should be removed at some point between the initial warning signal from the flankers and the commander's signal to open fire. This technique is not good for slowly moving foot patrols or units on a march. It might be audible to the target or to birds and animals around who will get scared and alert the enemy.
Initiating Fire and Actions During the Ambush
When someone approaches, the first security element to see the intruder passes the information to the members of the ambush party. The rest of the team uses any means of communication already planned (tugging or squeezing other members, etc.) to inform the commander. Nobody should react to the enemy's presence except to pass the information. It is up to the commander to initiate the ambush.
Fighters normally stare at their targets, and for some reason, people can feel when they are being watched (especially at short range). The ambush party should be instructed to use their peripheral vision to watch the enemy.
It's always the commander or his designee who decides to initiate the ambush or not. It may be a predetermined signal or when the target has reached a designated point.
The ambush can also be initiated with a weapon or explosives. Only casualty-producing weapons should be used to initiate an ambush. If a whistle or other signals are used, it gives the enemy precious seconds to react.
The ambush commander should wait until the enemy force is well into the killing zone before initiating the ambush. He should wait for at least 90% of the enemy force to be in the killing zone. When 10% of the enemy force is out of the killing zone, they have too much freedom to flank and use fire against the ambush party.
If attacking a vehicle column, the initial strike should target the front or rear vehicle, whichever is the weakest point of the ambush. If both fronts are equal strength, the initial strike should be directed at the trailing vehicle to prevent an accurate report from reaching the lead vehicle. This will likely cause greater separation in the convoy, preventing effective mass counterfire from the attacked vehicles and increasing the probability of ambush success.
Often when targeting a high-value target, the advance guards of a column are allowed to pass through the killing zone. When the high-value target reaches the predetermined point, it is halted by fire/obstacles/explosives. At this point, the entire assault element opens fire. Designated members of the ambush party engage the advance and rear guards to prevent reinforcement of the main column.
In some cases, before all the enemies have been killed at an ambush site, the commander may call for an assault on a target. In that event, the attack is launched under covering fire using a prearranged signal.